(!) Since support from Microsoft will end on January 14 2020, Windows 7 user might not be able to use MISUMI website effectively. Please consider to update your system as ‘MISUMI Website system requirement’.

ideanote
inCAD Library

Please read before use

What is inCAD Library?

  • Helpful application examples for mechanical engineers.

The Concept of inCAD Library

  • Online application library with a range of ideas for all manufacturing industries.
  • Save design time and learn new design applications when you are concepting new machines.

Disclaimer

  • MISUMI may not offer all parts in each application design. Available parts can only be purchased separately not as a unit shown in each application design.
  • MISUMI does not guarantee quality, accuracy, functionality, safety or reliability for the combination of the parts in each application example. Accept these points prior to use.
  • 2014 Copyright MISUMI
  • The data cannot be used for any purposes (including sales promotion) except for designing your machine.
  • All associated CAD is free. Misumi reserves the right at its sole discretion to cancel, terminate or modify this offer.
  • MISUMI may change, add or delete application examples posted without prior notice.
  • MISUMI assumes no responsibilities for any damage incurred resulting from your use of the Service or any change, addition or deletion by MISUMI of the application examples for any reason whatsoever.

inCAD Library Features

  1. Get great new design ideas for these application examples.
  2. Over 300 design application ideas
    collected from dozens of industries!

  3. Find application examples quickly! Search by function, workpiece shape, etc.

  4. Download the CAD models for each application example.
  5. Log in to download free CAD models.
    Download CAD for the entire application example!

Good IDEA! button

Click the Good IDEA! Button when you like an application example!

*Can only be clicked once per application example.

  • Upper right corner on the page of application example details

  • Pop-up dialog for CAD data downloading

Page top

Keyword Search
No. Search

No.000273 Guide Setup Changing Mechanism

The guides of the transfer conveyor can be changed continuously.

Tensioner Units

Product name Tensioner Units
Part number TNSR10-Y28-F10
Features Tensioner unit easy to assemble. Can be used by chain or belt drive.
* Orange colored cells in the table below indicate the part numbers used in this example.

Selection criteria

Utilizing a commercially available part diminishes design time.

Back to page top

Available sizes

■Tensioner Units

Material Surface Treatment
Fixing Plate Tension Pin Slide Plate Tension Block
1018 Carbon Steel-D 1045 Carbon Steel 1045 Carbon Steel
(precision casting)
1018 Carbon Steel-D Black Oxide
Electroless Nickel Plating

■Sizes and Dimensions

Tension Pin
Shaft Dia.
1mm Increments Stroke A B T J Z
Y F
10 10~50 8~50 25 120 50 6 24 21
12
15 12~60 10~50 25 125 55 9 31 29
17 30 140 60 30
20

Back to page top

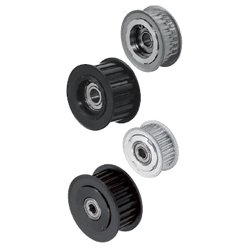
Idlers with Teeth

Product name Flanged Idlers with Teeth - P2M / P3M / P5M / P8M / 2GT / 3GT / 5GT / 8YU
Part number AGTF24GT5120
Features Can be used as the tension adjuster for timing belts or as the pulley on the driven side.
* Orange colored cells in the table below indicate the part numbers used in this example.

Selection criteria

Select commercially available item because it simplifies the design.

Back to page top

Available sizes

■Flanged Idlers with Teeth - P2M / P3M / P5M / P8M / 2GT / 3GT / 5GT / 8YU

Type Material Surface Treatment
Center Bearing Both Sides Bearing Main Body Flange Bearing
2017 Aluminum Alloy 5052 Aluminum Alloy Steel Clear Anodize
- - Hard Clear Anodize
1045 Carbon Steel Low Carbon Steel Black Oxide

■Sizes and Dimensions

Number of Teeth Applicable Belt Shaft Dia. Standard Circle Dia. O.D. Tooth Width
40 GT2060 6 25.46 24.96 30
GT2090 6
30 GT3060 6 28.65 27.89 32
GT3090 6
20 GT5090 8 31.83 30.69 35
GT5120 8
24 GT5090 10 38.20 37.06 42
GT5120 10
28 GT5090 10 44.56 43.42 48
GT5120 10
30 GT5090 12 47.75 46.61 51
GT5120 12
20 YU8150 20 50.93 49.56 62
YU8200 20
30 YU8150 25 76.39 75.02 85
YU8200 25
YU8250 25

Back to page top

Selection criteria

Select a Lead screw with both left and right hand threading.

Back to page top

Available sizes

■Lead Screws - Both Ends Stepped

Material Surface Treatment Compatible Lead Screw Nut
Type Material
1045 Carbon Steel Right / Left-hand Thread Brass
Black Oxide
Low Temp. Black Chrome Plating
303 Stainless Steel

■Sizes and Dimensions

Screw Shaft Nominal Pitch Overall Length
1mm Increments
14 3 80〜1000
16 100〜1200
18 4 150〜1200
20
22 5
25
28
32 6 200〜1200

Back to page top

Accuracy Info

■Lead Screw: Screw Shaft Runout Tolerance (Max.)

(mm)

Shaft Dia. Screw Shaft Length
-125 126
-200
201
-315
316
-400
401
-500
501
-630
631
-800
801
-1000
1001-
1250
1251-
1600
1601-
2000
φ8 0.1 0.14 0.21 0.27 0.35 - - - - - -
φ10-12 0.09 0.12 0.16 0.21 0.27 0.35 0.46 0.58 - - -
φ14 0.09 0.11 0.13 0.16 0.2 0.25 0.32 0.42 - - -
φ16 0.09 0.11 0.13 0.16 0.2 0.25 0.32 0.42 0.55 0.73 1
φ18-20 - 0.11 0.13 0.16 0.2 0.25 0.32 0.42 0.55 0.73 1
φ22-32 - 0.09 0.11 0.13 0.16 0.19 0.23 0.3 0.38 0.5 0.69
φ36-50 - 0.11 0.11 0.11 0.13 0.15 0.17 0.22 0.27 0.34 0.46

■Lead Screw Accuracy Standards

Item Content
Allowable Dimension and Tolerance JISB0217 0218
Screw Accuracy 7e Class
Nut Accuracy 7H Class
Single Pitch Error ±0.02
Accumulated Pitch Error ±0.15/300mm
Length Tolerance JISB0405 (medium class)
Screw Shaft End DIA. Tolerance h7

Back to page top

Technical calculations

■Lead Screw and Lead Screw Nut Selection Steps

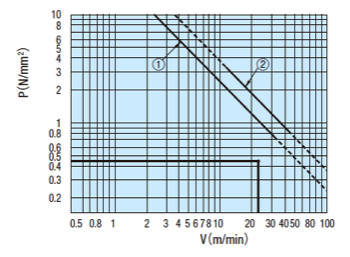
Calculate Contact Pressure P and Sliding Velocity V based on conditions of use to check that no abnormal wear will occur.
Plot the calculated P and V values against the PV value graph and confirm the intersection.
If the intersection falls inside of line (1) and (2), it is determined that abnormal wear would not occur

Determine Conditions of Use

Lead Screw and Lead Screw Nut Temporary Selection

(1) Contact surface pressure P, (2) Sliding speed V calculations
Verify that the value is within (1) and (2) of the PV value graph

Calculate Screw Efficiency η and Load Torque T

(axial load, rotational speed)


(lead screw and lead screw nut material)

(If not good)

PV Value Graph

  • (1) Steel (lubrication) - Brass
  • (2) Steel (non-lubrication) - Plastic
PV Value graph

(1) Contact Surface Pressure P (N/mm²)

Contact Surface Pressure P
  • Fs: Shaft Axial Load (N)
  • F0: Allowable Dynamic Thrust (N)  -> Nuts for Lead Screw Specifications
    Thrust when contact surface pressure of the lead screw and nut becomes 9.8 (N/mm²)
  • α: 9.8 (brass)  0.98 (plastic)

(2) Sliding Speed V (m/min)

すべり速度V
  • d2: Screw Shaft Effective DIA. → From Lead Screw Specifications Table
  • d: Screw Shaft Lead Angle (deg.)  -> Lead Screw Specifications
  • n: Screw Shaft Rotation per Minute (min-1)

(3) Screw Efficiency η

Screw Efficiency η
  • μ: Dynamic Friction Coefficient
  • d: Screw Shaft Lead Angle (deg.)

Thread Shaft Nuts for Lead Screws Dynamic Friction Coefficient μ
Steel (lubrication) Brass 0.21
Steel (non-lubrication) Polyacetal/
PPS Resin with Sliding Property
0.13

(4) Load Torque (N・cm)

Load Torque
  • Fs: Shaft Axial Load
  • η: Screw Efficiency
  • R: Lead (cm)

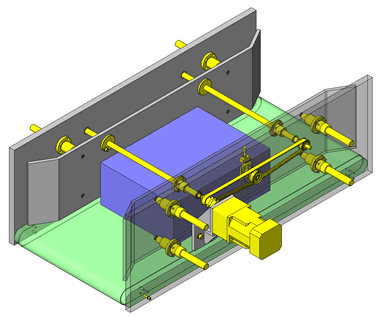
IDEA NOTE Continuous changeover of the workpiece guides

The guides are moved to any width by rotating the left and right screws with a motor.

  • TERMS AND CONDITIONS FOR USE OF CAD DATA
    Your access to the CAD data that MISUMI Corporation (hereinafter referred to as the Company) posts on this site (including 3D CAD data, intermediate 3D CAD data and 2D CAD data; hereinafter referred to as the Data) are of products manufactured and/or sold by the Company (hereinafter referred to as the Products) assumes that you have read and accepted these terms and conditions which govern your use of the Data. If you do not agree to these terms and conditions, you must stop using this website and the Data. You must not use the Data for any unlawful purpose or in any manner inconsistent with these terms and conditions.
    1. CAD Data
    The Data is prepared for assisting the Company's users in the CAD design process by providing dimensions and other Product information. In order to provide the best speed and stability working within this site, the Product drawings were simplified to reduce the size of the Data. For instance, some of the Products are shown without the oil groove shape, screws or spring shape. Also, please be aware that the tolerance, surface roughness and/or chamfer of the Data may vary from the actual Products.
    2. Disclaimer on Data
    While the Company has carefully prepared the Data, accuracy of the Data is not guaranteed and is subject to the variances as described above. The Company may also modify, add or delete the Data at any time without prior notice. The Company assumes no liability for any direct, indirect, consequential or special damages that you may claim resulted from your use of the Data or any changes to or deletions of the Data regardless of the reason. The Company provides no warranty as to the quality, accuracy, functionality, safety or reliability of the combination of Products and parts. Example applications and combinations of the Products are provided for illustrative purposes only.
    3. Copyright
    Copyrights to the content and the Data belong to the Company or the manufacturers of the Products. The said copyright is protected by the Copyright Act and international treaties. The use (including duplication, modification, uploading, posting, transmission, distribution, licensing, sales and publishing) of the Data except for the purpose to use the Data described above without prior approval of the Company is not allowed. The Data cannot be used for any purposes (including sales promotion) except for designing your machine. If you violate this provision or the laws or regulations, the Company may prohibit you from the use of the Data, the Company’s site and/or take legal action. So long as you comply with these terms and conditions, the Company grants to you a non-exclusive, non-transferable, revocable license to access and use the Data for the sole purpose of assisting you in designing machines that incorporate products.
    In case that the CAD data is found to have been to be used for any purpose other than mentioned above or against the related laws, MISUMI may take legal actions, including the one for blocking the involved user from using CAD data and from accessing to the MISUMI site.
    4. Disclaimer of Warranty
    ANY AND ALL CONTENT APPEARING ON THIS WEB SITE IS PROVIDED FOR INFORMATIONAL PURPOSES ONLY. THIS WEB SITE, ITS CONTENT AND ITS LINKS ARE PROVIDED ON AN "AS IS" AND "AS AVAILABLE" BASIS AND ARE USED ONLY AT YOUR SOLE RISK, TO THE FULLEST EXTENT PERMISSIBLE BY LAW. THE COMPANY DISCLAIMS ALL WARRANTIES, EXPRESS OR IMPLIED, OF ANY KIND, REGARDING THIS WEB SITE (INCLUDING ITS CONTENT, HARDWARE, SOFTWARE AND LINKS), INCLUDING AS TO FITNESS FOR A PARTICULAR PURPOSE, MERCHANTABILITY, TITLE, NON INFRINGEMENT, RESULTS, ACCURACY, COMPLETENESS, ACCESSIBILITY, COMPATIBILITY, SECURITY AND FREEDOM FROM COMPUTER VIRUS. THE COMPANY WILL NOT BE LIABLE FOR ANY DAMAGES OR LOSSES, INCLUDING DIRECT, INDIRECT, CONSEQUENTIAL, SPECIAL, INCIDENTAL OR PUNITIVE DAMAGES AND/OR LOST PROFITS, IN CONNECTION WITH USE OF THE INTERNET, THIS WEB SITE, ITS CONTENT OR ITS LINKS
    Further, the Company will not be liable to you for any failure or delay by the Company to provide access to the Data or any of its obligations under these terms and conditions where such failure or delay is the direct or indirect result of any circumstances beyond the Company's reasonable control (and the Company's obligations will be suspended for the duration of such circumstances).

    CAD Download (Unit Assembly)

    CAD Download: File Format
    生成

    Thank you for downloading the data.

    Click the Good IDEA! button when you find interesting design tips.


    This data is utilized in order to list more useful application examples in the future.

    CAD Data Limitations

    1. Assembly data shows the assembly drawings in the concept design phase. The sole purpose of the data is to explain the structure and functionality of the assembly and is not considered nor to be used as a final design.
      You will need to edit the Data so that it meets your specific design conditions.
    2. Unit assembly Data consists of some sub-assemblies.
      It is configured so that each sub-assembly unit can be used as it is or edited.
    3. * The part in the frame is a sub-assembly unit.

    4. The Data for fabricated parts is based on easy-to-edit dimensions and shapes in sketches and histories.
    5. The Data including the third-part components are made by the Company.

    Page top

  • * Unit assembly Data consists of some sub-assemblies.
       It is configured so that each sub-assembly unit can be used as it is or edited.

Application Overview

Purpose

  • Motor drive is able to adjust the guides as needed.
  • Guide stays in sync because both left and right hand lead screws are used.

Points for use

  • The motor moves the guides to a specified width.

Target workpiece

  • Box
  • External dimensions: W150 ~ 300 x H150 x L400mm
  • Workpiece mass: 3 - 5kg

Design Specifications

Operating Conditions or Design Requirements

  • External Dimensions
    W500xH340xL1000mm
  • Guide dimensions
    H220xL1000xT9mm

Required Performance

  • Positioning precision: ±1mm unit

Selection Criteria for Main Components

  • Motor
    • Select a motor that can handle the weight of the guide.

Design Evaluation

Verification of main components

  • Verify allowable motor torque for meeting the required torque.
  • Motor
    • Conditional values: Guide weight W = 17 kg/piece, thread pitch P = 0.003m, thread efficiency η = 0.24, guide friction coefficient μ = 0.1, gravitational acceleration g = 9.8m/s², number of guides 2pieces
    • Required torque: T = W × g × μ × P/(2 × π × η) Thus, T = (17 × 2) × 9.8 × 0.1 × 0.003/(2 × π × 0.24) = 0.07(N・m) < 0.57(N・m) (60Hz)
    • Safety factor: 0.57/0.07 = 8.1

Other Design Consideration

  • An idler is installed at the middle point of the timing belt to adjust tension.

Explore Similar Application Examples

Page 1 / 40

Part List

No. Part Name Sample Picture MISUMI Part Number
(click the Part Number below for details)
Quantity
1 Couplings MCORK34-10-15 1
2 Gear Motors PACMR90-W90-V100 1
3 Tensioner TNSR10-Y28-F10 1
4 Flanged Idler AGTF24GT5120 1
5 Timing Belts GBN900EV5GT-120 1
6 High Torque Timing Pulleys GPA20GT5120-B-H10 2
7 Linear Shaft VPFJT20-200-M5 8
8 Linear Bushings LHMRW20 8
9 Lead Screws MTSYW16-545-F20-V10-S65-Q10-X200 2
10 Lead Screw Nuts MTSFR16 2
11 Oil Free Bushings MPFZ10-15 4
12 Gear Motors PACMGZ90-20 1
14 Socket Head Cap Screws-with Washer SCBS5-25 12
15 Socket Head Cap Screws-with Washer SCBS6-15 16
16 Socket Head Cap Screws-with Washer SCBS8-25 2
17 Lead Screw Nuts MTSFL16 2
  • The part list above only contains MISUMI parts.
    Part list download (CSV) includes MISUMI and third party components used in this example.
  • TERMS AND CONDITIONS FOR USE OF CAD DATA
    Your access to the CAD data that MISUMI Corporation (hereinafter referred to as the Company) posts on this site (including 3D CAD data, intermediate 3D CAD data and 2D CAD data; hereinafter referred to as the Data) are of products manufactured and/or sold by the Company (hereinafter referred to as the Products) assumes that you have read and accepted these terms and conditions which govern your use of the Data. If you do not agree to these terms and conditions, you must stop using this website and the Data. You must not use the Data for any unlawful purpose or in any manner inconsistent with these terms and conditions.
    1. CAD Data
    The Data is prepared for assisting the Company's users in the CAD design process by providing dimensions and other Product information. In order to provide the best speed and stability working within this site, the Product drawings were simplified to reduce the size of the Data. For instance, some of the Products are shown without the oil groove shape, screws or spring shape. Also, please be aware that the tolerance, surface roughness and/or chamfer of the Data may vary from the actual Products.
    2. Disclaimer on Data
    While the Company has carefully prepared the Data, accuracy of the Data is not guaranteed and is subject to the variances as described above. The Company may also modify, add or delete the Data at any time without prior notice. The Company assumes no liability for any direct, indirect, consequential or special damages that you may claim resulted from your use of the Data or any changes to or deletions of the Data regardless of the reason. The Company provides no warranty as to the quality, accuracy, functionality, safety or reliability of the combination of Products and parts. Example applications and combinations of the Products are provided for illustrative purposes only.
    3. Copyright
    Copyrights to the content and the Data belong to the Company or the manufacturers of the Products. The said copyright is protected by the Copyright Act and international treaties. The use (including duplication, modification, uploading, posting, transmission, distribution, licensing, sales and publishing) of the Data except for the purpose to use the Data described above without prior approval of the Company is not allowed. The Data cannot be used for any purposes (including sales promotion) except for designing your machine. If you violate this provision or the laws or regulations, the Company may prohibit you from the use of the Data, the Company’s site and/or take legal action. So long as you comply with these terms and conditions, the Company grants to you a non-exclusive, non-transferable, revocable license to access and use the Data for the sole purpose of assisting you in designing machines that incorporate products.
    In case that the CAD data is found to have been to be used for any purpose other than mentioned above or against the related laws, MISUMI may take legal actions, including the one for blocking the involved user from using CAD data and from accessing to the MISUMI site.
    4. Disclaimer of Warranty
    ANY AND ALL CONTENT APPEARING ON THIS WEB SITE IS PROVIDED FOR INFORMATIONAL PURPOSES ONLY. THIS WEB SITE, ITS CONTENT AND ITS LINKS ARE PROVIDED ON AN "AS IS" AND "AS AVAILABLE" BASIS AND ARE USED ONLY AT YOUR SOLE RISK, TO THE FULLEST EXTENT PERMISSIBLE BY LAW. THE COMPANY DISCLAIMS ALL WARRANTIES, EXPRESS OR IMPLIED, OF ANY KIND, REGARDING THIS WEB SITE (INCLUDING ITS CONTENT, HARDWARE, SOFTWARE AND LINKS), INCLUDING AS TO FITNESS FOR A PARTICULAR PURPOSE, MERCHANTABILITY, TITLE, NON INFRINGEMENT, RESULTS, ACCURACY, COMPLETENESS, ACCESSIBILITY, COMPATIBILITY, SECURITY AND FREEDOM FROM COMPUTER VIRUS. THE COMPANY WILL NOT BE LIABLE FOR ANY DAMAGES OR LOSSES, INCLUDING DIRECT, INDIRECT, CONSEQUENTIAL, SPECIAL, INCIDENTAL OR PUNITIVE DAMAGES AND/OR LOST PROFITS, IN CONNECTION WITH USE OF THE INTERNET, THIS WEB SITE, ITS CONTENT OR ITS LINKS
    Further, the Company will not be liable to you for any failure or delay by the Company to provide access to the Data or any of its obligations under these terms and conditions where such failure or delay is the direct or indirect result of any circumstances beyond the Company's reasonable control (and the Company's obligations will be suspended for the duration of such circumstances).

    CAD Download (Unit Assembly)

    CAD Download: File Format
    生成

    Thank you for downloading the data.

    Click the Good IDEA! button when you find interesting design tips.


    This data is utilized in order to list more useful application examples in the future.

    CAD Data Limitations

    1. Assembly data shows the assembly drawings in the concept design phase. The sole purpose of the data is to explain the structure and functionality of the assembly and is not considered nor to be used as a final design.
      You will need to edit the Data so that it meets your specific design conditions.
    2. Unit assembly Data consists of some sub-assemblies.
      It is configured so that each sub-assembly unit can be used as it is or edited.
    3. * The part in the frame is a sub-assembly unit.

    4. The Data for fabricated parts is based on easy-to-edit dimensions and shapes in sketches and histories.
    5. The Data including the third-part components are made by the Company.

    Page top

Page top

Loading...