(!) Since support from Microsoft will end on January 14 2020, Windows 7 user might not be able to use MISUMI website effectively. Please consider to update your system as ‘MISUMI Website system requirement’.

ideanote
inCAD Library

Please read before use

What is inCAD Library?

  • Helpful application examples for mechanical engineers.

The Concept of inCAD Library

  • Online application library with a range of ideas for all manufacturing industries.
  • Save design time and learn new design applications when you are concepting new machines.

Disclaimer

  • MISUMI may not offer all parts in each application design. Available parts can only be purchased separately not as a unit shown in each application design.
  • MISUMI does not guarantee quality, accuracy, functionality, safety or reliability for the combination of the parts in each application example. Accept these points prior to use.
  • 2014 Copyright MISUMI
  • The data cannot be used for any purposes (including sales promotion) except for designing your machine.
  • All associated CAD is free. Misumi reserves the right at its sole discretion to cancel, terminate or modify this offer.
  • MISUMI may change, add or delete application examples posted without prior notice.
  • MISUMI assumes no responsibilities for any damage incurred resulting from your use of the Service or any change, addition or deletion by MISUMI of the application examples for any reason whatsoever.

inCAD Library Features

  1. Get great new design ideas for these application examples.
  2. Over 300 design application ideas
    collected from dozens of industries!

  3. Find application examples quickly! Search by function, workpiece shape, etc.

  4. Download the CAD models for each application example.
  5. Log in to download free CAD models.
    Download CAD for the entire application example!

Good IDEA! button

Click the Good IDEA! Button when you like an application example!

*Can only be clicked once per application example.

  • Upper right corner on the page of application example details

  • Pop-up dialog for CAD data downloading

Page top

Keyword Search
No. Search

No.000277 Workpiece Air Tightness Check Fixture

Checks air leakage by creating an air tight condition with a cylinder.

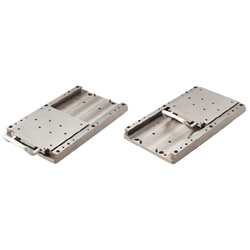
Fixture Slides

Product name Fixture Slides - Guide Rail Type
Part number JGR250
Features High load capacity is achieved by use of guide rails. Suitable for high load applications, such as press-fitting, press and machining.
* Orange colored cells in the table below indicate the part numbers used in this example.

Selection criteria

Select the slide unit with guide for mounting/dismounting workpieces.

Back to page top

Available sizes

■Fixture Slides - Guide Rail Type

Main Body Material Surface Treatment
Table 1045 Carbon Steel Thermal Refined Material Electroless
Nickel Plating
Plate
Guide Rail
Handle Bracket 1045 Carbon Steel
Handle Alum. Alloy Clear Anodize

■Sizes and Dimensions

Type Stroke
(mm)
Table Size
(mm)
Base Length
(mm)
150 50・100・150 150×150 325
250 150・200・250 150×150 425

Back to page top

Performance info.

■Speeds·Loads (Load info.) of Sliders for Fixture

Type Required Thrust
(N)
Plunger Retaining Force
(N)
Withstand Load
(kN)
150 10 30 37.2
250 10 30 37.2

Back to page top

Air Cylinder

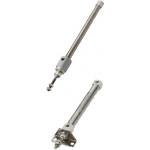
Product name Air Cylinders - Pen, Double Acting
Part number MSPCN20-50
Features Double Acting Type Cylinders - Compact and Pen-style - for increased space saving
* Orange colored cells in the table below indicate the part numbers used in this example.

Selection criteria

Select the cylinder that has the thrust capable of pressing the lid for air tight test of workpiece.

Back to page top

Available sizes

■Air Cylinders - Pen, Double Acting

Cyl.
Bore
Cylinder Stroke Cylinder O.D. Overall Length
(Listed below + St)
St 15 25 30 45 50 60 100
φ6 - - - 12×12 77
φ10 - - - 12×12 74
φ16 - - - 18×18 75
φ20 - - - 28×28 131
φ25 - - - 33.5×33.5 142
φ32 - - - 37.5x37.5 155

* Sensor is sold separately

Back to page top

Selection steps

■Cylinder Selection Steps

1. Define various conditions of the load.

2. Calculate cylinder output (In case of double acting type)

3. Determine the bore dia.

4. Determine the theoretical reference speed.

5. Verify the cylinder's cushion mechanism.

6. Verify the lateral load applied to the cylinder.

Back to page top

Performance info.

■Compact Cylinder Operating Pressure Range

Min. Operating Pressure (MPa): 0.06
Max. Operating Pressure (MPa): 0.7
Pressure Resistance (MPa): 1.0

■Theoretical Thrust

(N)

Cyl.
bore
Operating
Direction
Operating Pressure (MPa)
0.4 0.5
φ6 Push 11.3 14.1
Pull 8.5 10.6
φ10 Push 31.4 39.3
Pull 26.4 33
φ16 Push 80 101
Pull 73 91
φ20 Push 126 157
Pull 94 118
φ25 Push 196 245
Pull 165 206
φ32 Push 322 402
Pull 346 415

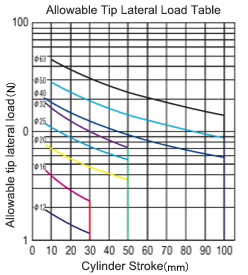
■Allowable Lateral Load

Back to page top

EPT Sealer® Sponge

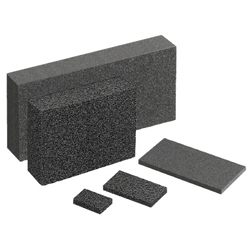
Product name Dustproof General-Purpose Sponges
Part number EPA-100-100-5
Features High performance sealing material that can fill all types of gaps to keep out heat, moisture and sound.
* Orange colored cells in the table below indicate the part numbers used in this example.

Selection criteria

Provides an air tight seal

Back to page top

Risk info.

Cutting may be required to suit workpiece size.

Back to page top

Available sizes

■Dustproof General-Purpose Sponges

Material
Sponge Seal
EPDM Foam
(EPT Sealer®)
Adhesive with Unwoven
Cloth Base Material
EPDM Foam
(Opsealer®)
Adhesive with Net
Base Material

■Sizes and Dimensions

10 mm Increment Thickness (Selectable)
Long Length Direction Short Length Direction
20~500 20~400 3
5
8
10
15
20
25
30

Back to page top

Accuracy Info

■Accuracy of EPT Sealer® Sponge

Thickness Tolerance
3~10 ±1.0
15~25 ±2.0
30 ±2.5
External Dimensions Tolerance
20 ±2.0
30~50 ±2.5
60~140 ±3.5
150~290 ±6.5
300~500 ±9.0

Back to page top

Performance info.

■Characteristic Value of EPT Sealer® Sponge

* The values are not guaranteed but measured ones.

Measurement Item EPA
(Unwoven Cloth Base Material)
EPAOP
(Net Base Material)
Color Black Black
Specific Gravity 0.11 0.08
Tensile Strength 0.08 0.1
Elongation (%) 450 205
Compression Hardness (25%) (kg/cm²) 0.02 0.04
Compression Hardness (50%) (kg/cm²) 0.05 0.05
Compression Ratio (%) 50 ×
60
70
80

○: No leakage of water after 30min.
△: Leakage of water is seen after 30min.
X: Leakage of water is seen within 10min.

Back to page top

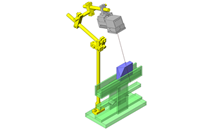
IDEA NOTE Checks air leakage by creating an air tight condition with a cylinder.

Compresses the sheet mounted on the pusher by using cylinder thrust.

  • TERMS AND CONDITIONS FOR USE OF CAD DATA
    Your access to the CAD data that MISUMI Corporation (hereinafter referred to as the Company) posts on this site (including 3D CAD data, intermediate 3D CAD data and 2D CAD data; hereinafter referred to as the Data) are of products manufactured and/or sold by the Company (hereinafter referred to as the Products) assumes that you have read and accepted these terms and conditions which govern your use of the Data. If you do not agree to these terms and conditions, you must stop using this website and the Data. You must not use the Data for any unlawful purpose or in any manner inconsistent with these terms and conditions.
    1. CAD Data
    The Data is prepared for assisting the Company's users in the CAD design process by providing dimensions and other Product information. In order to provide the best speed and stability working within this site, the Product drawings were simplified to reduce the size of the Data. For instance, some of the Products are shown without the oil groove shape, screws or spring shape. Also, please be aware that the tolerance, surface roughness and/or chamfer of the Data may vary from the actual Products.
    2. Disclaimer on Data
    While the Company has carefully prepared the Data, accuracy of the Data is not guaranteed and is subject to the variances as described above. The Company may also modify, add or delete the Data at any time without prior notice. The Company assumes no liability for any direct, indirect, consequential or special damages that you may claim resulted from your use of the Data or any changes to or deletions of the Data regardless of the reason. The Company provides no warranty as to the quality, accuracy, functionality, safety or reliability of the combination of Products and parts. Example applications and combinations of the Products are provided for illustrative purposes only.
    3. Copyright
    Copyrights to the content and the Data belong to the Company or the manufacturers of the Products. The said copyright is protected by the Copyright Act and international treaties. The use (including duplication, modification, uploading, posting, transmission, distribution, licensing, sales and publishing) of the Data except for the purpose to use the Data described above without prior approval of the Company is not allowed. The Data cannot be used for any purposes (including sales promotion) except for designing your machine. If you violate this provision or the laws or regulations, the Company may prohibit you from the use of the Data, the Company’s site and/or take legal action. So long as you comply with these terms and conditions, the Company grants to you a non-exclusive, non-transferable, revocable license to access and use the Data for the sole purpose of assisting you in designing machines that incorporate products.
    In case that the CAD data is found to have been to be used for any purpose other than mentioned above or against the related laws, MISUMI may take legal actions, including the one for blocking the involved user from using CAD data and from accessing to the MISUMI site.
    4. Disclaimer of Warranty
    ANY AND ALL CONTENT APPEARING ON THIS WEB SITE IS PROVIDED FOR INFORMATIONAL PURPOSES ONLY. THIS WEB SITE, ITS CONTENT AND ITS LINKS ARE PROVIDED ON AN "AS IS" AND "AS AVAILABLE" BASIS AND ARE USED ONLY AT YOUR SOLE RISK, TO THE FULLEST EXTENT PERMISSIBLE BY LAW. THE COMPANY DISCLAIMS ALL WARRANTIES, EXPRESS OR IMPLIED, OF ANY KIND, REGARDING THIS WEB SITE (INCLUDING ITS CONTENT, HARDWARE, SOFTWARE AND LINKS), INCLUDING AS TO FITNESS FOR A PARTICULAR PURPOSE, MERCHANTABILITY, TITLE, NON INFRINGEMENT, RESULTS, ACCURACY, COMPLETENESS, ACCESSIBILITY, COMPATIBILITY, SECURITY AND FREEDOM FROM COMPUTER VIRUS. THE COMPANY WILL NOT BE LIABLE FOR ANY DAMAGES OR LOSSES, INCLUDING DIRECT, INDIRECT, CONSEQUENTIAL, SPECIAL, INCIDENTAL OR PUNITIVE DAMAGES AND/OR LOST PROFITS, IN CONNECTION WITH USE OF THE INTERNET, THIS WEB SITE, ITS CONTENT OR ITS LINKS
    Further, the Company will not be liable to you for any failure or delay by the Company to provide access to the Data or any of its obligations under these terms and conditions where such failure or delay is the direct or indirect result of any circumstances beyond the Company's reasonable control (and the Company's obligations will be suspended for the duration of such circumstances).

    CAD Download (Unit Assembly)

    CAD Download: File Format
    生成

    Thank you for downloading the data.

    Click the Good IDEA! button when you find interesting design tips.


    This data is utilized in order to list more useful application examples in the future.

    CAD Data Limitations

    1. Assembly data shows the assembly drawings in the concept design phase. The sole purpose of the data is to explain the structure and functionality of the assembly and is not considered nor to be used as a final design.
      You will need to edit the Data so that it meets your specific design conditions.
    2. Unit assembly Data consists of some sub-assemblies.
      It is configured so that each sub-assembly unit can be used as it is or edited.
    3. * The part in the frame is a sub-assembly unit.

    4. The Data for fabricated parts is based on easy-to-edit dimensions and shapes in sketches and histories.
    5. The Data including the third-part components are made by the Company.

    Page top

  • * Unit assembly Data consists of some sub-assemblies.
       It is configured so that each sub-assembly unit can be used as it is or edited.

Application Overview

Purpose

  • Puts the workpiece in an air tight chamber. Air is blown in from external unit to check for air leakage in the weld on the workpiece.
  • The sponge sheet acts as a stopper for the cylinder stroke.

Points for use

  • A manual mechanism puts in and takes out the workpiece.

Target workpiece

  • Heat-welded plastic cases.
  • External dimensions: φ86 x 33mm
  • Weight 80g

Design Specifications

Operating Conditions or Design Requirements

  • Fixture slider stroke 250mm.
  • Cylinder stroke 45mm
  • External dimensions: W400xD430xH339mm

Required Performance

  • Cylinder thrust 113N or more at operating pressure of 0.4MPa.

Selection Criteria for Main Components

  • Cylinder
    • Ensure the cylinder meets the required thrust.

Design Evaluation

Verification of main components

  • Select the cylinder thrust from the counterforce at sheet compression.
  • Cylinder
    • Conditional values: Sheet compression stress p = 0.021MPa, sheet compression area S = 5408mm²
    • Counterforce at sheet compression: R = p × S Thus, R = 0.021 × 5408 ≒ 113N
      ⇒Select a cylinder with a thrust of 126N.

Other Design Consideration

  • Use of a fixture slider simplifies design.
  • The cylinder needs to compress the EPT sealer sponge to 70% or less of its thickness to ensure being air tight.
  • Installing a separate pressure gauge between the compressor and the corresponding equipment allows air leakage to be accurately detected.
  • A cover is installed on the cylinder operating part for safety.

Explore Similar Application Examples

Page - / -

Part List

No. Part Name Sample Picture MISUMI Part Number
(click the Part Number below for details)
Quantity
1 Jig Sliders JGR250 1
2 Air Cylinders MSPCN20-50 1
3 Floating Joints FJAZ8 1
4 Flow Rate Control Valves SPSNS6-1 2
5 One-Touch Couplings MSCNL6-1 1
6 Linear Shaft SFJC12-120-M6-SC15 2
7 Hex Posts LSBWF13-162 4
8 Linear Bushings LHFC12 2
9 Dustproof General-Purpose Sponges EPA-100-100-5 1
10 Socket Head Cap Screws-with Washer SCBS6-15 14
11 Socket Head Cap Screws-with Washer SCBS6-20 4
12 Socket Head Cap Screws-with Washer SCBS8-20 4
13 Socket Head Cap Screws-with Washer SCBS8-30 4
14 Socket Head Cap Screws-with Washer SCBS6-30 2
15 Sensors For Air Cylinder MSRCS20 2
  • The part list above only contains MISUMI parts.
    Part list download (CSV) includes MISUMI and third party components used in this example.
  • TERMS AND CONDITIONS FOR USE OF CAD DATA
    Your access to the CAD data that MISUMI Corporation (hereinafter referred to as the Company) posts on this site (including 3D CAD data, intermediate 3D CAD data and 2D CAD data; hereinafter referred to as the Data) are of products manufactured and/or sold by the Company (hereinafter referred to as the Products) assumes that you have read and accepted these terms and conditions which govern your use of the Data. If you do not agree to these terms and conditions, you must stop using this website and the Data. You must not use the Data for any unlawful purpose or in any manner inconsistent with these terms and conditions.
    1. CAD Data
    The Data is prepared for assisting the Company's users in the CAD design process by providing dimensions and other Product information. In order to provide the best speed and stability working within this site, the Product drawings were simplified to reduce the size of the Data. For instance, some of the Products are shown without the oil groove shape, screws or spring shape. Also, please be aware that the tolerance, surface roughness and/or chamfer of the Data may vary from the actual Products.
    2. Disclaimer on Data
    While the Company has carefully prepared the Data, accuracy of the Data is not guaranteed and is subject to the variances as described above. The Company may also modify, add or delete the Data at any time without prior notice. The Company assumes no liability for any direct, indirect, consequential or special damages that you may claim resulted from your use of the Data or any changes to or deletions of the Data regardless of the reason. The Company provides no warranty as to the quality, accuracy, functionality, safety or reliability of the combination of Products and parts. Example applications and combinations of the Products are provided for illustrative purposes only.
    3. Copyright
    Copyrights to the content and the Data belong to the Company or the manufacturers of the Products. The said copyright is protected by the Copyright Act and international treaties. The use (including duplication, modification, uploading, posting, transmission, distribution, licensing, sales and publishing) of the Data except for the purpose to use the Data described above without prior approval of the Company is not allowed. The Data cannot be used for any purposes (including sales promotion) except for designing your machine. If you violate this provision or the laws or regulations, the Company may prohibit you from the use of the Data, the Company’s site and/or take legal action. So long as you comply with these terms and conditions, the Company grants to you a non-exclusive, non-transferable, revocable license to access and use the Data for the sole purpose of assisting you in designing machines that incorporate products.
    In case that the CAD data is found to have been to be used for any purpose other than mentioned above or against the related laws, MISUMI may take legal actions, including the one for blocking the involved user from using CAD data and from accessing to the MISUMI site.
    4. Disclaimer of Warranty
    ANY AND ALL CONTENT APPEARING ON THIS WEB SITE IS PROVIDED FOR INFORMATIONAL PURPOSES ONLY. THIS WEB SITE, ITS CONTENT AND ITS LINKS ARE PROVIDED ON AN "AS IS" AND "AS AVAILABLE" BASIS AND ARE USED ONLY AT YOUR SOLE RISK, TO THE FULLEST EXTENT PERMISSIBLE BY LAW. THE COMPANY DISCLAIMS ALL WARRANTIES, EXPRESS OR IMPLIED, OF ANY KIND, REGARDING THIS WEB SITE (INCLUDING ITS CONTENT, HARDWARE, SOFTWARE AND LINKS), INCLUDING AS TO FITNESS FOR A PARTICULAR PURPOSE, MERCHANTABILITY, TITLE, NON INFRINGEMENT, RESULTS, ACCURACY, COMPLETENESS, ACCESSIBILITY, COMPATIBILITY, SECURITY AND FREEDOM FROM COMPUTER VIRUS. THE COMPANY WILL NOT BE LIABLE FOR ANY DAMAGES OR LOSSES, INCLUDING DIRECT, INDIRECT, CONSEQUENTIAL, SPECIAL, INCIDENTAL OR PUNITIVE DAMAGES AND/OR LOST PROFITS, IN CONNECTION WITH USE OF THE INTERNET, THIS WEB SITE, ITS CONTENT OR ITS LINKS
    Further, the Company will not be liable to you for any failure or delay by the Company to provide access to the Data or any of its obligations under these terms and conditions where such failure or delay is the direct or indirect result of any circumstances beyond the Company's reasonable control (and the Company's obligations will be suspended for the duration of such circumstances).

    CAD Download (Unit Assembly)

    CAD Download: File Format
    生成

    Thank you for downloading the data.

    Click the Good IDEA! button when you find interesting design tips.


    This data is utilized in order to list more useful application examples in the future.

    CAD Data Limitations

    1. Assembly data shows the assembly drawings in the concept design phase. The sole purpose of the data is to explain the structure and functionality of the assembly and is not considered nor to be used as a final design.
      You will need to edit the Data so that it meets your specific design conditions.
    2. Unit assembly Data consists of some sub-assemblies.
      It is configured so that each sub-assembly unit can be used as it is or edited.
    3. * The part in the frame is a sub-assembly unit.

    4. The Data for fabricated parts is based on easy-to-edit dimensions and shapes in sketches and histories.
    5. The Data including the third-part components are made by the Company.

    Page top

Page top