(!) Since support from Microsoft will end on January 14 2020, Windows 7 user might not be able to use MISUMI website effectively. Please consider to update your system as ‘MISUMI Website system requirement’.

ideanote
inCAD Library

Please read before use

What is inCAD Library?

  • Helpful application examples for mechanical engineers.

The Concept of inCAD Library

  • Online application library with a range of ideas for all manufacturing industries.
  • Save design time and learn new design applications when you are concepting new machines.

Disclaimer

  • MISUMI may not offer all parts in each application design. Available parts can only be purchased separately not as a unit shown in each application design.
  • MISUMI does not guarantee quality, accuracy, functionality, safety or reliability for the combination of the parts in each application example. Accept these points prior to use.
  • 2014 Copyright MISUMI
  • The data cannot be used for any purposes (including sales promotion) except for designing your machine.
  • All associated CAD is free. Misumi reserves the right at its sole discretion to cancel, terminate or modify this offer.
  • MISUMI may change, add or delete application examples posted without prior notice.
  • MISUMI assumes no responsibilities for any damage incurred resulting from your use of the Service or any change, addition or deletion by MISUMI of the application examples for any reason whatsoever.

inCAD Library Features

  1. Get great new design ideas for these application examples.
  2. Over 300 design application ideas
    collected from dozens of industries!

  3. Find application examples quickly! Search by function, workpiece shape, etc.

  4. Download the CAD models for each application example.
  5. Log in to download free CAD models.
    Download CAD for the entire application example!

Good IDEA! button

Click the Good IDEA! Button when you like an application example!

*Can only be clicked once per application example.

  • Upper right corner on the page of application example details

  • Pop-up dialog for CAD data downloading

Page top

Keyword Search
No. Search

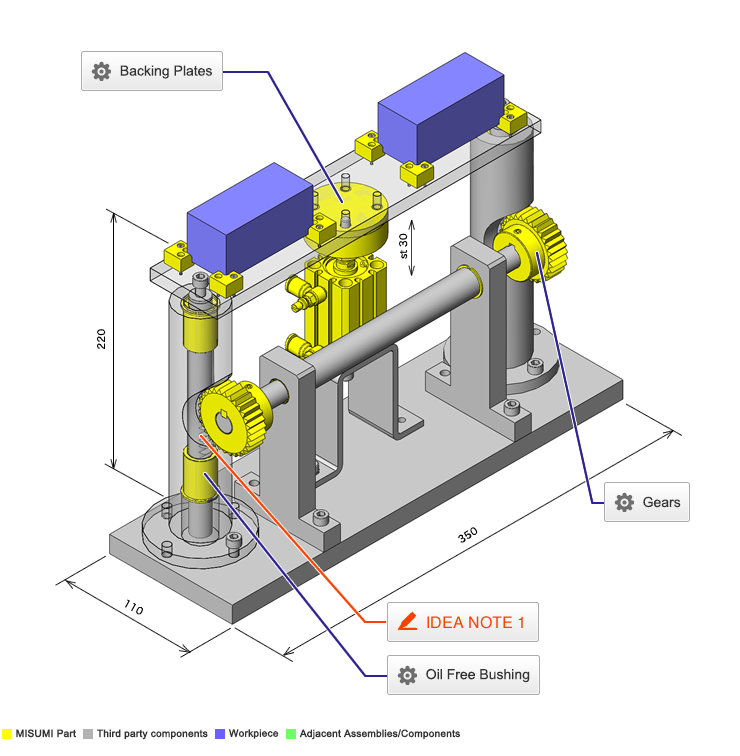
No.000157 Lifter Mechanism

Lifting mechanism guided by interlocking gears.

Relevant category

Backing Plates

Product name Floating Joint Backing Plates
Part number BPFA10
Features Cover plates intended to avoid the driven part from being damaged.
* Orange colored cells in the table below indicate the part numbers used in this example.

Selection criteria

It combines uses for avoiding the damages to the moving objects.

Back to page top

Available sizes

■Floating Joint Backing Plates

Material Hardness Surface Treatment
1045 Carbon Steel 45-50HRC Black Oxide
440C Stainless Steel
Applicable screw DIA. O.D.
3 42
4
5 48
6
8 51
10 54
12 70
14
16 90
18
20 106
22
24 116
26
30 134

Back to page top

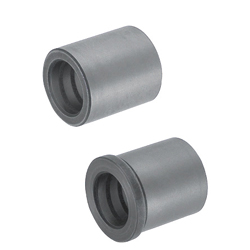
Oil Free Bushing

Product name Oil Free Metal Bushings
Part number SMZ15-30
Features Optimized for use in high load, low speed applications.
* Orange colored cells in the table below indicate the part numbers used in this example.

Selection criteria

Suitable for linear motion in oil free environment.

Back to page top

Available sizes

■Oil Free Metal Bushings

I.D.(mm) Length(mm) Material
6 6、8、10、12 Cast Iron Class No.35
Special Solid Lubricant
8 8、10、12、15
10 10、12、15、20
12 10、12、15-25(Increments of 5)
15 15-30(Increments of 5)
16 15-30(Increments of 5)
20 20-40(Increments of 5)、25
25 25、30-50(Increments of 10)
30 30-60(Increments of 10)

Back to page top

Accuracy Info

■Accuracy of oil free bushing (Casting)

I.D.
(mm)
I.D. Tolerance
(mm)
6 +0.014
+0.005
8
10
12 +0.017
+0.006
15
16
20 +0.020
+0.007
25
30

Back to page top

Performance info.

■Speeds / Loads (Load Info.) of Oil Free Bushings (Casting)

Regular Non-lubricated
Maximum Allowable Load 8N/mm² 5N/mm²
82kgf/cm² 51kgf/cm²
Maximum Allowable Velocity 0.25m/s 0.15m/s
15m/min 9m/min
Maximum Allowable PV Value 0.8
N/mm²・m/s
0.5
N/mm²・m/s
490
kgf/cm²・m/min
306
kgf/cm²・m/min

Back to page top

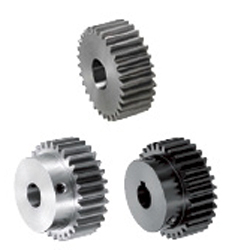
Gears

Product name Spur Gears - Pressure Angle 20Deg., Module 1.5
Part number GEAKB1.5-30-15-B-15N
* Orange colored cells in the table below indicate the part numbers used in this example.

Selection criteria

It enables one to obtain low price and high accuracy gears.

Back to page top

Available sizes

■Spur Gears - Pressure Angle 20Deg., Module 1.5

Material Surface Treatment Accessory
1045 Carbon Steel Set Screw
(4137 Alloy Steel Black Oxide)
Black Oxide
Electroless Nickel Plating
304 Stainless Steel Set Screw(304 Stainless Steel)

■Sizes and Dimensions

Type Module Number of Teeth Shaft Bore DIA.(1 mm increment)
Round Hole
Round Hole + Tap
Keyway
Keyway+Tap
Straight Bore


Straight Bore+Tap


Keyway


Keyway+Tap
1.5 12 6-12 8N
13 6-13
14 6-8
16 6-12 8N-12N
17
18 6-13
19 6-15
20 6-16
21
22 6-17
23 6-18 8N-13N
24 6-20 8N-15N
25
26 6-22 8N-17N
27 6-23 8N-18N
28
29 6-24 8N-19N
30
34 6-28 8N-24N
35
36
38 6-31 8N-28N
40 8-31 10N-28N
42
44
45
46
48 8-35 10N-31N
50
52
54 12-35 12N-31N
55
56
58
60 12-38 12N-35N
62
64
65
66
68
70 12-45 12N-42N
72
75
84
85
90
95
100
120 12-49 12N-45N
Gear specifications Shaft Bore Specs. 
Straight Bore Straight Bore
+Tap
Keyway Keyway
+Tap
Diameter Shape
No hub
With Hub

Back to page top

Accuracy Info

■Accuracy of Spur Gear

Gear accuracy:  Previous JIS B 1702 4 Class (New JIS B 1702-1 - 8 class equivalent)
Shaft Bore DIA. Tolerance: H7

Back to page top

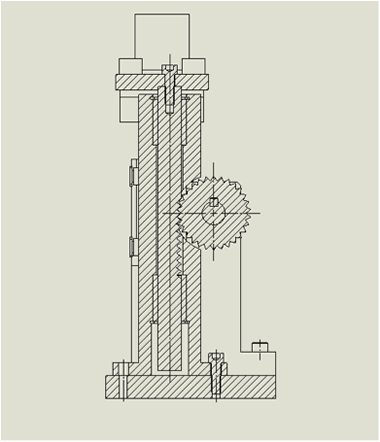
IDEA NOTE Minimized abrasion on shaft surface.

Abrasions on the guiding shaft surfaces are minimized by using interlocking gears to guide the vertical movements of the shafts.

  • TERMS AND CONDITIONS FOR USE OF CAD DATA
    Your access to the CAD data that MISUMI Corporation (hereinafter referred to as the Company) posts on this site (including 3D CAD data, intermediate 3D CAD data and 2D CAD data; hereinafter referred to as the Data) are of products manufactured and/or sold by the Company (hereinafter referred to as the Products) assumes that you have read and accepted these terms and conditions which govern your use of the Data. If you do not agree to these terms and conditions, you must stop using this website and the Data. You must not use the Data for any unlawful purpose or in any manner inconsistent with these terms and conditions.
    1. CAD Data
    The Data is prepared for assisting the Company's users in the CAD design process by providing dimensions and other Product information. In order to provide the best speed and stability working within this site, the Product drawings were simplified to reduce the size of the Data. For instance, some of the Products are shown without the oil groove shape, screws or spring shape. Also, please be aware that the tolerance, surface roughness and/or chamfer of the Data may vary from the actual Products.
    2. Disclaimer on Data
    While the Company has carefully prepared the Data, accuracy of the Data is not guaranteed and is subject to the variances as described above. The Company may also modify, add or delete the Data at any time without prior notice. The Company assumes no liability for any direct, indirect, consequential or special damages that you may claim resulted from your use of the Data or any changes to or deletions of the Data regardless of the reason. The Company provides no warranty as to the quality, accuracy, functionality, safety or reliability of the combination of Products and parts. Example applications and combinations of the Products are provided for illustrative purposes only.
    3. Copyright
    Copyrights to the content and the Data belong to the Company or the manufacturers of the Products. The said copyright is protected by the Copyright Act and international treaties. The use (including duplication, modification, uploading, posting, transmission, distribution, licensing, sales and publishing) of the Data except for the purpose to use the Data described above without prior approval of the Company is not allowed. The Data cannot be used for any purposes (including sales promotion) except for designing your machine. If you violate this provision or the laws or regulations, the Company may prohibit you from the use of the Data, the Company’s site and/or take legal action. So long as you comply with these terms and conditions, the Company grants to you a non-exclusive, non-transferable, revocable license to access and use the Data for the sole purpose of assisting you in designing machines that incorporate products.
    In case that the CAD data is found to have been to be used for any purpose other than mentioned above or against the related laws, MISUMI may take legal actions, including the one for blocking the involved user from using CAD data and from accessing to the MISUMI site.
    4. Disclaimer of Warranty
    ANY AND ALL CONTENT APPEARING ON THIS WEB SITE IS PROVIDED FOR INFORMATIONAL PURPOSES ONLY. THIS WEB SITE, ITS CONTENT AND ITS LINKS ARE PROVIDED ON AN "AS IS" AND "AS AVAILABLE" BASIS AND ARE USED ONLY AT YOUR SOLE RISK, TO THE FULLEST EXTENT PERMISSIBLE BY LAW. THE COMPANY DISCLAIMS ALL WARRANTIES, EXPRESS OR IMPLIED, OF ANY KIND, REGARDING THIS WEB SITE (INCLUDING ITS CONTENT, HARDWARE, SOFTWARE AND LINKS), INCLUDING AS TO FITNESS FOR A PARTICULAR PURPOSE, MERCHANTABILITY, TITLE, NON INFRINGEMENT, RESULTS, ACCURACY, COMPLETENESS, ACCESSIBILITY, COMPATIBILITY, SECURITY AND FREEDOM FROM COMPUTER VIRUS. THE COMPANY WILL NOT BE LIABLE FOR ANY DAMAGES OR LOSSES, INCLUDING DIRECT, INDIRECT, CONSEQUENTIAL, SPECIAL, INCIDENTAL OR PUNITIVE DAMAGES AND/OR LOST PROFITS, IN CONNECTION WITH USE OF THE INTERNET, THIS WEB SITE, ITS CONTENT OR ITS LINKS
    Further, the Company will not be liable to you for any failure or delay by the Company to provide access to the Data or any of its obligations under these terms and conditions where such failure or delay is the direct or indirect result of any circumstances beyond the Company's reasonable control (and the Company's obligations will be suspended for the duration of such circumstances).

    CAD Download (Unit Assembly)

    CAD Download: File Format
    生成

    Thank you for downloading the data.

    Click the Good IDEA! button when you find interesting design tips.


    This data is utilized in order to list more useful application examples in the future.

    CAD Data Limitations

    1. Assembly data shows the assembly drawings in the concept design phase. The sole purpose of the data is to explain the structure and functionality of the assembly and is not considered nor to be used as a final design.
      You will need to edit the Data so that it meets your specific design conditions.
    2. Unit assembly Data consists of some sub-assemblies.
      It is configured so that each sub-assembly unit can be used as it is or edited.
    3. * The part in the frame is a sub-assembly unit.

    4. The Data for fabricated parts is based on easy-to-edit dimensions and shapes in sketches and histories.
    5. The Data including the third-part components are made by the Company.

    Page top

  • * Unit assembly Data consists of some sub-assemblies.
       It is configured so that each sub-assembly unit can be used as it is or edited.

Application Overview

Purpose

  • Purpose
    • To raise and lower workpieces with minimal abrasion on the guiding shaft's surfaces.
  • Operation
    • A pneumatic cylinder provides the lifting force to raise the workpieces. The vertical movement is guided by two shafts with oil free bushings. Surface abrasion of the shafts is avoided by interconnecting them with a third shaft and a set of gears that interlocks with teeth machined on the two shafts.

Points for use

  • This design is suitable for carrying unbalanced loads.

Target workpiece

  • Shape: tray, pallet
  • Size: W35 x D78 x H36mm
  • Weight: 4.3kg

Design Specifications

Operating Conditions or Design Requirements

  • Ascending/descending stroke: 30mm
  • Outer dimensions: W110 x D350 x H210mm

Required Performance

  • Load + lifting unit: 4.3 + 2.2 = 6.5kg

Selection Criteria for Main Components

  • To raise and lower a workpiece load of approx. 6.5kg, a cylinder with an inner tube diameter of φ25mm is selected.

Design Evaluation

Verification of main components

  • The cylinder thrust is verified based on the workpiece load.
  • Selection of cylinder
    • Conditional value: workpiece mass W1 = 6.5kg, gravitational acceleration g =9.8m/s²、
      cylinder thrust (pulling side) F1 = 189N (operating pressure 0.5MPa)
    • The load F2 is
      F2 = W1 x g, therefore, F2 = 6.5 x 9.8 = 63.7N < F1
      ⇒There is no problem.

Other Design Consideration

  • Oil free bushings are selected to guide the motion of the shafts and reduce friction.

Explore Similar Application Examples

Page - / -

Part List

No. Part Name Sample Picture MISUMI Part Number
(click the Part Number below for details)
Quantity
1 Air Cylinders MSCCA25-30 1
2 Floating Joints FJA10 1
3 Backing Plate BPFA10 1
4 Metal Bushing SMZ15-30 4
5 Oil Free Bushings MDZF15-15 2
6 Spur Gear GEAKB1.5-30-15-B-15N 2
7 Retaining Rings RTWN24 4
8 Sensors for Air Cylinders MD13L3 2
9 Workpiece Guide WGDLJ-15-3-2 8
10 Parallel Keys KEGS5-25 2
11 Flow Rate Control Valves SPSNL6-M5 2
12 Hex Socket Set Screws MSSK5-8 2
  • The part list above only contains MISUMI parts.
    Part list download (CSV) includes MISUMI and third party components used in this example.
  • TERMS AND CONDITIONS FOR USE OF CAD DATA
    Your access to the CAD data that MISUMI Corporation (hereinafter referred to as the Company) posts on this site (including 3D CAD data, intermediate 3D CAD data and 2D CAD data; hereinafter referred to as the Data) are of products manufactured and/or sold by the Company (hereinafter referred to as the Products) assumes that you have read and accepted these terms and conditions which govern your use of the Data. If you do not agree to these terms and conditions, you must stop using this website and the Data. You must not use the Data for any unlawful purpose or in any manner inconsistent with these terms and conditions.
    1. CAD Data
    The Data is prepared for assisting the Company's users in the CAD design process by providing dimensions and other Product information. In order to provide the best speed and stability working within this site, the Product drawings were simplified to reduce the size of the Data. For instance, some of the Products are shown without the oil groove shape, screws or spring shape. Also, please be aware that the tolerance, surface roughness and/or chamfer of the Data may vary from the actual Products.
    2. Disclaimer on Data
    While the Company has carefully prepared the Data, accuracy of the Data is not guaranteed and is subject to the variances as described above. The Company may also modify, add or delete the Data at any time without prior notice. The Company assumes no liability for any direct, indirect, consequential or special damages that you may claim resulted from your use of the Data or any changes to or deletions of the Data regardless of the reason. The Company provides no warranty as to the quality, accuracy, functionality, safety or reliability of the combination of Products and parts. Example applications and combinations of the Products are provided for illustrative purposes only.
    3. Copyright
    Copyrights to the content and the Data belong to the Company or the manufacturers of the Products. The said copyright is protected by the Copyright Act and international treaties. The use (including duplication, modification, uploading, posting, transmission, distribution, licensing, sales and publishing) of the Data except for the purpose to use the Data described above without prior approval of the Company is not allowed. The Data cannot be used for any purposes (including sales promotion) except for designing your machine. If you violate this provision or the laws or regulations, the Company may prohibit you from the use of the Data, the Company’s site and/or take legal action. So long as you comply with these terms and conditions, the Company grants to you a non-exclusive, non-transferable, revocable license to access and use the Data for the sole purpose of assisting you in designing machines that incorporate products.
    In case that the CAD data is found to have been to be used for any purpose other than mentioned above or against the related laws, MISUMI may take legal actions, including the one for blocking the involved user from using CAD data and from accessing to the MISUMI site.
    4. Disclaimer of Warranty
    ANY AND ALL CONTENT APPEARING ON THIS WEB SITE IS PROVIDED FOR INFORMATIONAL PURPOSES ONLY. THIS WEB SITE, ITS CONTENT AND ITS LINKS ARE PROVIDED ON AN "AS IS" AND "AS AVAILABLE" BASIS AND ARE USED ONLY AT YOUR SOLE RISK, TO THE FULLEST EXTENT PERMISSIBLE BY LAW. THE COMPANY DISCLAIMS ALL WARRANTIES, EXPRESS OR IMPLIED, OF ANY KIND, REGARDING THIS WEB SITE (INCLUDING ITS CONTENT, HARDWARE, SOFTWARE AND LINKS), INCLUDING AS TO FITNESS FOR A PARTICULAR PURPOSE, MERCHANTABILITY, TITLE, NON INFRINGEMENT, RESULTS, ACCURACY, COMPLETENESS, ACCESSIBILITY, COMPATIBILITY, SECURITY AND FREEDOM FROM COMPUTER VIRUS. THE COMPANY WILL NOT BE LIABLE FOR ANY DAMAGES OR LOSSES, INCLUDING DIRECT, INDIRECT, CONSEQUENTIAL, SPECIAL, INCIDENTAL OR PUNITIVE DAMAGES AND/OR LOST PROFITS, IN CONNECTION WITH USE OF THE INTERNET, THIS WEB SITE, ITS CONTENT OR ITS LINKS
    Further, the Company will not be liable to you for any failure or delay by the Company to provide access to the Data or any of its obligations under these terms and conditions where such failure or delay is the direct or indirect result of any circumstances beyond the Company's reasonable control (and the Company's obligations will be suspended for the duration of such circumstances).

    CAD Download (Unit Assembly)

    CAD Download: File Format
    生成

    Thank you for downloading the data.

    Click the Good IDEA! button when you find interesting design tips.


    This data is utilized in order to list more useful application examples in the future.

    CAD Data Limitations

    1. Assembly data shows the assembly drawings in the concept design phase. The sole purpose of the data is to explain the structure and functionality of the assembly and is not considered nor to be used as a final design.
      You will need to edit the Data so that it meets your specific design conditions.
    2. Unit assembly Data consists of some sub-assemblies.
      It is configured so that each sub-assembly unit can be used as it is or edited.
    3. * The part in the frame is a sub-assembly unit.

    4. The Data for fabricated parts is based on easy-to-edit dimensions and shapes in sketches and histories.
    5. The Data including the third-part components are made by the Company.

    Page top

Page top