Acrylic Plate -Cast Type -Custom Size

Caution
- The total light transmittance is measured at a thickness of 3mm. These are for reference, not guaranteed.
Product Description
[Standard large quantity available] For standard sizes and hole-machined types from 21 to 100 pieces, a 15% discount is available without the need for an estimate. [Standard large quantity available] For side milling cutters of 11 to 20 pieces, a 5% discount is available without the need for an estimate.
Drawing
■Number of Holes Combination Type (With Corner Holes Pre-Drilled)
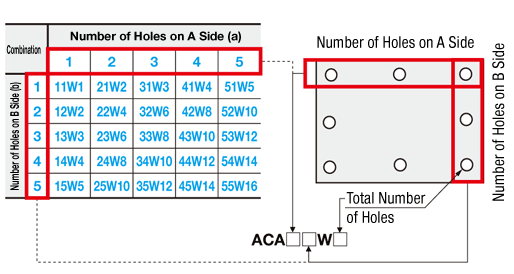 ■Number of Holes Combination Table ■Part Number Ordering Codes
 [!] The formula for calculating the total number of holes is 2a + 2b - 4. When a and b are 1, then a × b.
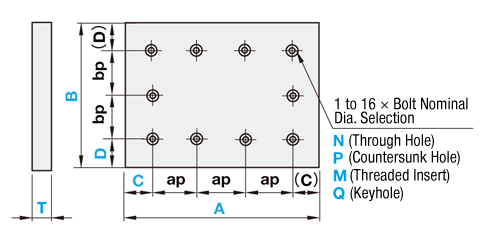
| Machining Method | Surface texture | |
| 4 Sides | Circular sawing |  |
| Upper-Lower Surface | Material |  |
[!] The pitch between holes is equally divided. The formula for calculating the pitch is ap = (A - 2C)/(a - 1), bp = (B - 2D)/(b - 1).
[!] When the number of holes per side is 1, the (C) and (D) dimensions are not applied to the holes from the end face. (Asymmetrical machining)
[ ! ] Only burrs generated on the cut part are removed.
To prevent cuts on the corners, please specify additional machining for 4 corners of the same size.
| Hole Machining Details | ||||||||||||||||||||||||||||||||||||||||||||||||
| N (Through Hole) | P (Countersink) | M (Threaded Insert) | Hole Machining Conditions (N・P·M) | |||||||||||||||||||||||||||||||||||||||||||||
 |  |  Ordering Code (Example) M4-L6 [ ! ]L ≤ T-1 |  | |||||||||||||||||||||||||||||||||||||||||||||
| ■Table 1
|
| ||||||||||||||||||||||||||||||||||||||||||||||
| Q (Keyhole) | Hole Machining Condition Q (Keyhole) | |||||||||||||||||||||||||||||||||||||||||||||||
 |
| [ ! ] Keyhole Machining Condition c ≥ 5 | ||||||||||||||||||||||||||||||||||||||||||||||
[ ! ] Use with | "Keyhole Position" (1): The center of bp dimension is consistent with the center of D dimension. (2): When there are 3 or more holes on one side, the pitch is equally divided around d1. (3): The center of diameter d1 for the keyhole is consistent with the value for the center of C(D). | |||||||||||||||||||||||||||||||||||||||||||||||
■Number of Holes Combination Type (No Corner Drilling)
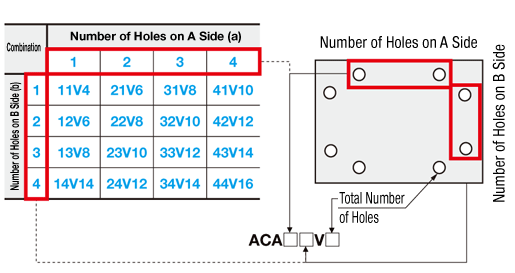 ■Number of Holes Combination Table ■Part Number Ordering Codes
 [ ! ] The formula for calculating the total number of holes is 2a + 2b.
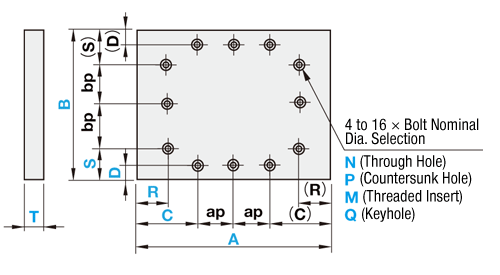
| Machining Method | Surface texture | |
| 4 Sides | Circular sawing |  |
| Upper-Lower Surface | Material |  |
[!] The pitch between holes is equally divided. The formula for calculating the pitch is ap = (A - 2C)/(a - 1), bp = (B - 2S)/(b - 1).
[ ! ] Only burrs generated on the cut part are removed.
To prevent cuts on the corners, please specify additional machining for 4 corners of the same size.
| Hole Machining Details | ||||||||||||||||||||||||||||||||||||||||||||||||
| N (Through Hole) | P (Countersink) | M (Threaded Insert) | Hole Machining Conditions (N・P·M) | |||||||||||||||||||||||||||||||||||||||||||||
 |  |  Ordering Code (Example) M4-L6 [ ! ]L ≤ T-1 |  | |||||||||||||||||||||||||||||||||||||||||||||
| ■Table 1
|
| ||||||||||||||||||||||||||||||||||||||||||||||
| Q (Keyhole) | Hole Machining Condition Q (Keyhole) | |||||||||||||||||||||||||||||||||||||||||||||||
 |
| [ ! ] Keyhole Machining Condition c ≥ 5 | ||||||||||||||||||||||||||||||||||||||||||||||
[ ! ]Use with | "Keyhole Position" (1): The center of bp dimension is consistent with the center of D and R dimension. (2): When there are 3 or more holes on one side, the pitch is equally divided around d1 | |||||||||||||||||||||||||||||||||||||||||||||||
■ Hole Machined Type
| Finish | 4 Sides | Upper-Lower Surface | ||
| Machining Method | Surface texture | Machining Method | Surface texture | |
| Circular sawing | Circular sawing |  | Material |  |
 2H2HL4H6H8H
■ Standard Type

[ ! ]A ≥ B
| Finish | 4 Sides | Upper-Lower Surface | ||
| Machining Method | Surface texture | Machining Method | Surface texture | |
| Circular sawing | Circular sawing |  | Material |  |
| 4-side Milling (4F) | Milling |  | Material |  |
Product Specifications
| Type | [M]Grade | Color | Light Transmittance | Operating Ambient Temperature |
| ACA | Standard | Transparent | 93% | -30 to 80°C |
| ACBA | Standard | Brown Smoke | 25% | |
| ACDA | Standard | Orange | 43% | |
| ACTA | Antistatic | Transparent | 79% | |
| ACBTA | Antistatic | Brown Smoke | 32% |
| Type | [M]Grade | Color | Light Transmittance | Operating Ambient Temperature |
| ACA | Standard | Transparent | 93% | -30 to 80°C |
| ACA-G | ||||
| ACBA | Brown Smoke | 25% | ||
| ACDA | Orange | 43% | ||
| ACTA | Antistatic | Transparent | 79% | |
| ACBTA | Brown Smoke | 32% |
| Type | ||
| ACA | Kanase | Kanase Lite #1300 |
| ACBA | Kanase | Kanase Lite #1382 |
| ACDA | Kanase | Kanase Lite #1351 |
| ACTA | Sekisui Chemical | AC405AS |
| ACBTA | Sekisui Chemical | AC425AS |
| Item | Testing Method JIS | Unit | Acrylic (cast) | |||
| Standard | Antistatic | |||||
| Mechanical Properties | Tensile Strength | K-7113 | Mpa {kgf/cm2} | 75 {760} | 75 {760} | |
| Elongation | K-7113 | % | 2 to 7 | 5 | ||
| Bending Strength | K-7203 | Mpa {kgf/cm2} | 117 {1200} | 106 {1080} | ||
| Flexural Modulus | K-7203 | Mpa | 3.2 × 10³ | 3.3 × 10³ | ||
| Compression Strength | Yield Point | K-7181 | Mpa {kgf/cm2} | 124 {1270} | — | |
| Izod Impact Strength | K-7110 | kJ/m2 | 2.7 | — | ||
| Rockwell Hardness | M Scale | — | — | 100 | 100 | |
| Thermal Characteristics | Continuous Use | — | °C | -30 to 80 | — | |
| Deflection Temp. Under Load | 0.45 MPa | K-7191 | °C | 100 | 85 | |
| Linear Expansion Coefficient | K-7140 | °C-1 | 7.0 × 10⁻⁵ | 5.9 × 10⁻⁵ | ||
| Thermal Conductivity | — | W/m·K | 0.21 | — | ||
| Specific Heat | — | J/g·K | 1.46 | 1.46 | ||
| Electric Characteristics | Surface Resistivity | K-6911 | Ω | > 1015 | 106Up to 108 | |
| Specific Volume Resistivity | K-6911 | Ω·cm | > 1015 | > 1017 | ||
| Insulation Breakdown Voltage | K-6911 | kV/mm | 20 | — | ||
| Dielectric Constant | 106 Hz | K-6911 | — | 3.2 | 2.9 | |
| Dissipation Factor | 106 Hz | K-6911 | — | 0.06 | 0.032 | |
| Transmittance | Light transmittance by color | Transparent | — | % | 93 | 79 |
| Smoke Brown | 25 | 32 | ||||
| Orange | — | |||||
| Smoke Gray | — | — | ||||
| Visible Light Transmittance | - | % | — | — | ||
| Others | Specific Gravity | — | — | 1.2 | 1.2 | |
| Water Absorption Ratio | K-7209 | % | 0.4 | 0.18 | ||
| Flame Resistance | — | — | × | × | ||
| Chemical Resistance | Oil | — | — | ○ | ○ | |
| Acid | — | — | ○ | ○ | ||
| Alkali | — | — | ○ | ○ | ||
| Organic Solvent | — | — | × ~△ | × ~△ | ||
Part Number Display Method
| Part Number | — | A | — | B | — | T | — | C | — | D | — | Screw Nominal Dia. |
| ACA33W8 | — | 200 | — | 100 | — | 5 | — | C20 | — | D10 | — | N5 |
| Part Number | — | A | — | B | — | T | — | C | — | D | — | R | — | S | — | Screw Nominal Dia. |
| ACA22V8 | — | 200 | — | 100 | — | 5 | — | C60 | — | D20 | — | R20 | — | S60 | — | N5 |
| Part Number | — | A | — | B | — | T | — | F | — | G | — | Screw Nominal Dia. | — | L |
| ACA6H ACA6H | — — | 800 800 | — — | 400 400 | — — | 3 8 | — — | F250 F250 | — — | G355 G300 | — — | N3 M4 | — | L6 |
| Part Number | — | A | — | B | — | T |
| ACTA | — | 955 | — | 825 | — | 3 |
| ACA-G | — | 500 | — | 400 | — | 50 |
| Part Number | — | A | — | B | — | T |
| L−ACA | — | 1500 | — | 800 | — | 5 |
| Part Number | — | A | — | B | — | T |
| ACA4FQ | — | 300 | — | 200 | — | 15 |
Specification Table
| Part Number | A | B | T Selection | Hole position indication | Bolt Nominal Dia. Selection | ||||||||||||||||||||||
| Type | combination of holes | C | D | Through Hole | Countersunk Hole | Keyhole | Threaded Insert | ||||||||||||||||||||
| Side A Number of Holes | Side B Number of Holes | Hole Machining Shape | Number of Holes | 1 mm Increments | ACA | ACBA | ACDA ACTA ACBTA | 0.5 mm Increments Unit | N | P | Q | M | L | ||||||||||||||
| ACA ACBA ACDA ACTA ACBTA | 1 2 3 4 5 | 1 2 3 4 5 | W | 1 3 5 8 12 16 | 2 4 6 10 14 | 20 ~ 1200 | 20 ~ 1000 | 3 | 3 | 3 | 6 ~ 1191.5 | 6 ~ 991.5 | 3 4 5 6 8 10 | 3 | 5 6 8 | — | Select from Table 1 | ||||||||||
| 4 | 4 | — | 3 | 4 | 5 | 3 | |||||||||||||||||||||
| 5 | 5 | 5 | 3 | 4 | 5 | 6 | 3 | 4 | |||||||||||||||||||
| 6 | 6 | — | 4 | 5 | 6 | 4 | 5 | ||||||||||||||||||||
| 8 | 8 | — | 4 | 5 | 6 | 8 | 4 | 5 | 6 | ||||||||||||||||||
| 10 | 10 | — | 4 | 5 | 6 | 8 | 10 | 4 | 5 | 6 | 8 | ||||||||||||||||
| ACA | 20 ~ 800 | 20 ~ 600 | 15 | — | — | 6 ~ 795.5 | 6 ~ 591.5 | 4 | 5 | 6 | 8 | 10 | 5 | 6 | 8 | 10 | |||||||||||
| 20 | — | — | 4 | 5 | 6 | 8 | 10 | 5 | 6 | 8 | 10 | ||||||||||||||||
| 25 | — | — | 4 | 5 | 6 | 8 | 10 | 5 | 6 | 8 | 10 | ||||||||||||||||
When drilling through holes or countersunk holes, a distance of 2.5 mm or more is required between the holes or between the end faces and holes. A diameter of 5 mm or more is required for keyholes.
| T | T Dimension Tolerance |
| 3 | ±0.5 |
| 4·5 | ±0.6 |
| 6 | ±0.8 |
| 8 | ±0.9 |
| 10 | ±1.1 |
| 15 | ±1.5 |
| 20 | ±2.0 |
| 25 | ±2.5 |
Acrylic Plates (Cast)
Same as Standard Type.
| Part Number | A | B | T Selection | Hole position indication | Bolt Nominal Dia. Selection | |||||||||||||||||||||||
| Type | combination of holes | C | D | R | S | Through Hole | Countersunk Hole | Keyhole | Threaded Insert | |||||||||||||||||||
| Side A Number of Holes | Side B Number of Holes | Hole Machining Shape | Number of Holes | 1 mm Increments | ACA | ACBA | ACDA ACTA ACBTA | 0.5 mm Increments | N | P | Q | M | L | |||||||||||||||
| ACA ACBA ACDA ACTA ACBTA | 1 2 3 4 | 1 2 3 4 | V | 4 6 8 10 12 14 16 | 20 ~ 1200 | 20 ~ 1000 | 3 | 3 | 3 | 6 ~ 1191.5 | 6 ~ 991.5 | 6 ~ 1191.5 | 6 ~ 991.5 | 3 4 5 6 8 10 | 3 | 5 6 8 | — | table1 from Selection | ||||||||||
| 4 | 4 | — | 3 | 4 | 5 | 3 | ||||||||||||||||||||||
| 5 | 5 | 5 | 3 | 4 | 5 | 6 | 3 | 4 | ||||||||||||||||||||
| 6 | 6 | — | 4 | 5 | 6 | 4 | 5 | |||||||||||||||||||||
| 8 | 8 | — | 4 | 5 | 6 | 8 | 4 | 5 | 6 | |||||||||||||||||||
| 10 | 10 | — | 4 | 5 | 6 | 8 | 10 | 4 | 5 | 6 | 8 | |||||||||||||||||
| ACA | 20 ~ 800 | 20 ~ 600 | 15 | — | — | 6 ~ 795.5 | 6 ~ 591.5 | 6 ~ 795.5 | 6 ~ 591.5 | 4 | 5 | 6 | 8 | 10 | 5 | 6 | 8 | 10 | ||||||||||
| 20 | — | — | 4 | 5 | 6 | 8 | 10 | 5 | 6 | 8 | 10 | |||||||||||||||||
| 25 | — | — | 4 | 5 | 6 | 8 | 10 | 5 | 6 | 8 | 10 | |||||||||||||||||
When drilling through holes, countersunk holes or threaded inserts, a distance of 2.5 mm or more is required between the holes or between the end faces and holes. A diameter of 5 mm or more is required for keyholes.
| T | T Dimension Tolerance |
| 3 | ±0.5 |
| 4·5 | ±0.6 |
| 6 | ±0.8 |
| 8 | ±0.9 |
| 10 | ±1.1 |
| 15 | ±1.5 |
| 20 | ±2.0 |
| 25 | ±2.5 |
Acrylic Plates (Cast)
Same as Standard Type.
| ■ Hole Machined Type | |||||||||||||||||||||||
| Material Code | Number of Holes | A | B | T Selection | F | G | Bolt Nominal Dia. Selection | ||||||||||||||||
| Through Hole | Countersunk Hole | Keyhole | Threaded Insert | ||||||||||||||||||||
| 1 mm Increments | ACA | ACBA | ACDA ACTA ACBTA | 0.5 mm Increments | N | P | Q | M | L | ||||||||||||||
| ACA (Standard, Transparent) ACBA (Standard, Smoke Brown) ACDA (Standard, Orange) ACTA (Antistatic, Transparent) ACBTA (Antistatic, Smoke Brown) | 2H(Horizontal) 2HL(Vertical) 4H 6H 8H | 20 to 1200 | 20 to 1000 | 3 | 3 | 3 | 6 to 1191.5 (2H·4H) 4.5 to 1195.5 (2HL) 6 to 595.5 (6H·8H) | 4.5 to 995.5 (2H) 6 to 991.5 (2HL·4H·6H) 6 to 495.5 (8H) | 3 4 5 6 8 10 | 3 | 5 6 8 | - | from Table 1 Selection | ||||||||||
| 4 | 4 | - | 3 | 4 | 5 | 3 | |||||||||||||||||
| 5 | 5 | 5 | 3 | 4 | 5 | 6 | 3 | 4 | |||||||||||||||
| 6 | 6 | - | 4 | 5 | 6 | 4 | 5 | ||||||||||||||||
| 8 | 8 | - | 4 | 5 | 6 | 8 | 4 | 5 | 6 | ||||||||||||||
| 10 | 10 | - | 4 | 5 | 6 | 8 | 10 | 4 | 5 | 6 | 8 | ||||||||||||
| ACA (Standard, Transparent) | 20 to 800 | 20 to 600 | 15 | - | - | 6 to 791.5 (2H·4H) 4.5 to 795.5 (2HL) 6 to 395.5 (6H·8H) | 4.5 to 595.5 (2H) 6 to 591.5 (2HL·4H·6H) 6 to 295.5 (8H) | 5 | 6 | 8 | 10 | 5 | 6 | 8 | 10 | ||||||||
| 20 | - | - | 5 | 6 | 8 | 10 | 5 | 6 | 8 | 10 | |||||||||||||
| 25 | - | - | 5 | 6 | 8 | 10 | 5 | 6 | 8 | 10 | |||||||||||||
for 6H and 8H: d (d1) + 2.5 ≤ F ≤ (A - d (d1) - 5)/2 is required.
[!]Dimension G Specification Range – 2H type selection: d (d1)/2 + 2.5 ≤ G ≤ B - d (d1)/2 - 2.5; for 2HL, 4H and 6H: d (d1) + 2.5 ≤ G ≤ B - d (d1) - 5;
for 8H: d (d1) + 2.5 ≤ G ≤ (B - d (d1) - 5)/2 is required. (d for through hole, d1 for countersunk)
| T | T Dimension Tolerance |
| 3 | ±0.5 |
| 4·5 | ±0.6 |
| 6 | ±0.8 |
| 8 | ±0.9 |
| 10 | ±1.1 |
| 15 | ±1.5 |
| 20 | ±2.0 |
| 25 | ±2.5 |
| Part Number | A | B | T | ||
| Material | Finish Selection | A, B Dimension Tolerance | |||
| Standard Size | Circular sawing | 1 mm Increments | Selection | ||
| ACA (Standard, Transparent) | - | Not available | 20 to 1200 | 20 to 1000 | 3·4·5·6·8·10 |
| 20 to 800 | 20 to 600 | 15·20·25 | |||
| ACA-G (Standard, Transparent, Thick Plate Type) | 20 to 800 | 13 | |||
| (30)Up to 800 | (30)Up to 800 | 30·40·50 | |||
| ACBA (Standard, Smoke Brown) | 20 to 1200 | 20 to 1000 | 3·4·5·6·8·10 | ||
| ACDA (Standard, Orange) ACTA (Antistatic, Transparent) ACBTA (Antistatic, Smoke Brown) | 3·5 | ||||
| Large Size | 1201 to 2000 | 20 to 1000 | 3·5 | ||
| L−ACA (Standard, Transparent) L−ACBA (Standard, Smoke Brown) L−ACTA (Antistatic, Transparent) L−ACBTA (Antistatic, Smoke Brown) | |||||
| Standard Size | 4-side Milling | 0.1 mm Increments | Selection | ||
| ACA (Standard, Transparent) | 4F | Q (0 to +0.2) N (±0.1) M (-0.2 to 0) | 10 to 400 | 10 to 200 | 5·6·8·10·15·20·25 |
| ACBA (Standard, Smoke Brown) | 5·6·8·10 | ||||
| ACDA (Standard, Orange) ACTA (Antistatic, Transparent) ACBTA (Antistatic, Smoke Brown) | 5 | ||||
| T | T Dimension Tolerance |
| 3 | ±0.5 |
| 4·5 | ±0.6 |
| 6 | ±0.8 |
| 8 | ±0.9 |
| 10·13 | ±1.1 |
| 15 | ±1.5 |
| 20 | ±2.0 |
| 25 to 50 | ±2.5 |
Alterations
■Number of Holes Combination Type (With Corner Holes Pre-Drilled)| Part Number | — | A | — | B | — | T | — | C | — | D | — | Screw Nominal Dia. | — | (Alterations) |
| ACA33W8 | — | 200 | — | 100 | — | 5 | — | C20 | — | D10 | — | N5 | — | ACC |
| Alterations | Same Dimension Machining for 4 Corners | |||||||
 |  | |||||||
| Code | ACC | ACR | ||||||
| Spec. | All four corners can be cut and radius machined to the same dimensions (5 mm). ·ACC: Corner 5 mm Cut ·ACR: Corner 5 mm Radius Machining [ ! ] For the machining conditions of the hole and plate end face, see 
| |||||||
■Number of Holes Combination Type (No Corner Drilling)
| Part Number | — | A | — | B | — | T | — | C | — | D | — | R | — | S | — | Screw Nominal Dia. | — | (Alterations) |
| ACA22V8 | — | 200 | — | 100 | — | 5 | — | C60 | — | D20 | — | R20 | — | S60 | — | N5 | — | ACR |
| Alterations | Same Dimension Machining for 4 Corners | |||||||
 |  | |||||||
| Code | ACC | ACR | ||||||
| Spec. | All four corners can be cut and radius machined to the same dimensions (5 mm). ·ACC: Corner 5 mm Cut ·ACR: Corner 5 mm Radius Machining [ ! ] For the machining conditions of the hole and plate end face, see 
| |||||||
■ Hole Machined Type
| Part Number | — | A | — | B | — | T | — | F | — | G | — | Screw Nominal Dia. | — | (XC·YC) |
| ACA4H | — | 200 | — | 100 | — | 4 | — | F160 | — | G50 | — | N6 | — | XC15-YC355 |
| Alterations | Hole Position from Left | Hole Position from Bottom | Same Dimension Machining for 4 Corners | |||||||
 |  |  |  | |||||||
| Code | XC | YC | ACC | ACR | ||||||
| Spec. | XC = 0.5 mm Increments [ ! ] For the machining conditions of the hole and plate end face, see Hole Machining Conditions under Hole Machining Details [ ! ]Can be specified only for Hole Machined Type (2H to 8H) | YC = 0.5 mm Increments [ ! ] For the machining conditions of the hole and plate end face, see Hole Machining Conditions under Hole Machining Details [ ! ] | All four corners can be cut and radius machined to the same dimensions (5 mm). ·ACC: Corner 5 mm Cut ·ACR: Corner 5 mm Radius Machining [ ! ] For the machining conditions of the hole and plate end face, see 
| |||||||
■ Standard Type
| Part Number | — | A | — | B | — | T | — | (CRA: etc) |
| ACA | — | 100 | — | 80 | — | 3 | — | CRA10-CRC10 |
| Alterations | Aluminum Extrusion Blind Joint Notch | Relief at 4 Corners | Corner Cut, Corner Radius Machining | Same Dimension Machining for 4 Corners | ||||
 |  | 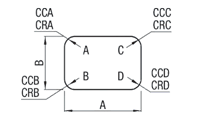 |  |  | ||||
| Code | F□□, E□□, J□□, K□□ | CN | CCA·CCB·CCC·CCD CRA·CRB·CRC·CRD | ACC | ACR | |||
| Spec. | Machines relief for blind joints of aluminum extrusions. [ ! ] Can only be specified for the standard sizes of standard types | Machines relief at 4 corners. CN = 1 mm Increments [ ! ]5 ≤ CN ≤ 50 Ordering Code CN = 25→CN25 [ ! ] Can only be specified for the standard sizes of standard types | Machines any corner (ABCD) upon request. 5 mm increments ·CCA5 = A Corner 5 mm Cut ·CRB5 = B Corner 5 mm Radius Machining [ ! ] Can only be specified for the standard sizes of standard types [ ! ] Cannot be combined with Same Dimension Machining for 4 Corners | All four corners can be cut and radius machined to the same dimensions (5 mm). ·ACC: Corner 5 mm Cut ·ACR: Corner 5 mm Radius Machining [ ! ] For the machining conditions of the hole and plate end face, see Hole Machining Conditions under | ||||
[ ! ] Alteration can only be specified for the standard sizes
Properties
Acrylic properties
Excels in transparency, weather resistance and machinability, and is used widely for indoor and outdoor purposes, such as covers for industrial machinery, art display cases and signboards.
Characteristics of Acrylic Cast Plates and Extruded Plates
As for Acrylic Plates, cast plates made by cell-cast method and extruded plates are available.
Cast plates have better heat resistance and stronger mechanical strength than extruded plates. Extruded plates are more inexpensive than cast plates.
When extruded plates have contact with vaporizing liquid such as methanol and methylene chloride after they are thermal-processed with laser or others, they may have cracks.
Also, extruded plates may have deflection at high temperature.
Technical Information
Transmittance Curve on Each Wavelength
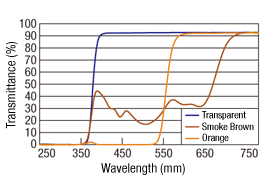 Transmittance Curve on Each Wavelength (3 mm)
More Information

